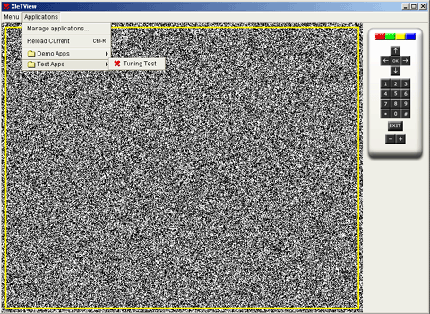
To run an application, go to the "Applications" menu and choose the application that you want to run. This menu will include any applications that XleTView knows about. In the example below, we have two groups of applications, called "Demo Apps" and "Test Apps". The "Test Apps" group contains a single Xlet called "Tuning Test".
The XleTView applications menu.

Selecting an application from the menu will automatically start that application. Any graphical output from your application will appear on the simulated screen, and any output on System.out or System.err will appear on the console (if you started XleTView from the command line). Choosing "Reload Current" from the "Applications" menu (or pressing CTRL-R) will re-start the application, but it will not reload the application classes.
Before we can run an application, however, we need to tell XleTView about it so that XleTView knows which applications are available and where it should load them from.
Telling XleTView about your applications
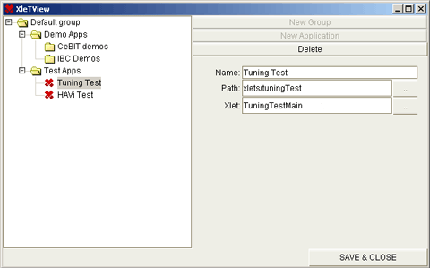
In a normal MHP or OCAP receiver, applications are signaled via the AIT. This is not possible with XleTView, so we need another way to tell it about available applications. The simplest way to do this is via the applications menu. Go to the "Applications" menu and choose the "Manage Applications…" option. This will bring up the applications dialog:
Managing applications in XleTView.

From here, we can define applications and groups of applications that can be run in XleTView. To define a new group, click on the group in the left pane that will contain the new group and then press the "New Group" button. To change the name of the new group, highlight it in the left pane and then enter the new name in the dialog.
Adding an application is equally easy. In the left-hand pane, select the group that will contain the new application. Then, click on the "New Application" button in the right-hand pane. This will create a new application entry. Highlighting the entry for an application will show the properties of that application and allow you to edit them. At the moment, three properties are available for every application:
- Name: The name you wish to give your Xlet.
- Path: The path to the Xlet’s root directory
- Xlet: The name of your Xlet’s main class
These are a subset of the properties that would be signalled in the AIT of a broadcast service. At the moment, it’s not possible to send arguments to your Xlet using XleTView.
Once you have finished adding applications, click the "SAVE & CLOSE" button to save your changes and exit the applications dialog. Any changes you have made will take effect immediately. Information about applications and groups is stored in the applications.xml file, and so we can also edit this file directly to add or remove groups and applications. A typical example of this file looks like this:
<!-- top element in this xml file -->
<APPLICATIONS>

  <!-- top element for one Xlet,
       resides in the default group -->
  <APPLICATION>
    <!-- name of the Xlet -->
    <NAME>Foo Xlet</NAME>

    <!-- path to the Xlet -->
    <PATH>H:\MHP\foo\classes\</PATH>

    <!-- the main class of the Xlet -->
    <XLET>foo.FooXlet</XLET>
  </APPLICATION>


  <!-- A second Xlet -->
  <APPLICATION>
    <NAME>Bar Xlet</NAME>
    <PATH>H:\MHP\bar\classes\</PATH>
    <XLET>bar.barXlet</XLET>
  </APPLICATION>

  <!-- this makes a group called demos -->
  <GROUP NAME="demos">
    <APPLICATION>
      <NAME>Demo Xlet</NAME>
      <PATH>H:\MHP\demo\demo_1\classes\</PATH>
      <XLET>demo.DemoXlet</XLET>
    </APPLICATION>
  </GROUP>
</APPLICATIONS>
As you can see, this consists of a set of <APPLICATION> tags, each describing one Xlet. Each description will contain the name, main class and path for that Xlet as we saw in the applications dialog.
The <GROUP> tag lets us group Xlets together, so that we can maintain different groups of Xlets for different purposes. If an Xlet is not listed within a group, then it is automatically added to the default group. If you look at the menus in the screenshot above, you will see that groups appear as sub-menus on the "Applications" menu.
Like other configuration files in XleTView, this is only read at startup if you modified the file directly. You must restart XleTView for any changes to take effect. As we have already mentioned, you do not need to restart if you have added or modified applications via the applications dialog.
Before you run your application, you need to make sure that its settings are correct. The most important of these is the application classpath, which is different from the system classpath that you set for your Java installation. The application classpath is set in the settings.xml file, and this only applies to your application. Do not include any MHP stub classes in your application classpath. These are already included in the classpath used by XleTView, and so adding them again will only cause problems.
Where to store your application files
XleTView will only run applications that are stored in a different directory to the XleTView application itself. Do not store your application files in the same directory as xletview.jar. You should also store your application class files separately from any stub classes that you are compiling against. This will make sure that XleTView loads the correct versions of the classes.
Controlling your application
Like any other MHP receiver, you can use the remote control to interact with your application. Unlike other MHP receivers, however, many of the remote control keys are mapped on to your keyboard as well, which is useful if you want to control your Xlets using a real remote control unit connected to your PC to give that extra touch of realism during demos. The number keys on your keyboard are mapped to the buttons 0-9 on the remote, while function keys F1 to F4 correspond to the red, green, yellow and blue coloured buttons respectively. The cursor keys correspond to the four arrow keys on the remote. At the moment, the channel up/channel down buttons on the remote do not have keyboard shortcuts. Keys on the numeric keypad are not used by XleTView, and so only the number keys and cursor keys on your main keyboard will work.
If your applications needs keys that are not present on the default remote control, you can add new buttons to the remote controls as shown in the section on configuring XleTView.
