To control how audio and video content is decoded and displayed, JavaTV and MHP rely on he Java Media Framework defined by Sun Microsystems. While this is mostly used for controlling what broadcast video is presented (and how it is presented), applications can also use JMF to play audio files or display a special kind of image format.
JMF was chosen for use with MHP and JavaTV mainly because it was a standardized API for media control that already existed, and DVB doesn’t like re-inventing the wheel unless it has to. Although the API hasn’t changed much from Sun’s original JMF specification, there are some new restrictions on what does and doesn’t work, and on the return values from some of the methods. These were needed because JMF tends to focus on playing media where it has complete control of the media source, and this just isn’t the case in a broadcast environment.
For instance, a normal JMF-based application that’s playing a media clip from a hard disk can pause the playback and start it later, choose which point in the stream to start the playback from, and fast-forward and rewind through the clip. With a broadcast stream, this just isn’t possible because the receiver must deal with whatever data is currently being broadcast. In a broadcast environment, if you pause the video stream and un-pause it after a few seconds, the video will jump to what’s currently being broadcast and not start playing from where it stopped.
This is only one of the places where there is a fairly major change in philosophy between the PC and broadcast worlds. To be honest, JMF probably wasn’t the ideal choice for a media control API given its strong focus on PC-based media, but it was a lot easier to use JMF than to define something new, and there are an awful lot of people who already know how to use JMF.
If you’re not one of those people, the rest of this part is a fairly gentle introduction to JMF. If you are familiar with JMF, you can skip to the next section, which describes the DTV-specific JMF extensions.
The JMF API lives in the javax.media package, although some DTV-specific extensions are located in a couple of other packages that we’ll see later. MHP uses version 1.1 of the JMF API – this has some substantial differences from the JMF 2.x API that is standard at the time of writing. Mostly, JMF 1.1 only handles playback and does not cover recording, which makes the overall API a lot simpler and smaller.
JMF has three major concepts that you need to understand before you can really use it effectively. The most important element of JMF is a player. This is the class that is actually responsible for decoding and playing the media. Every Player object has a set of zero or more controls associated with it. A JMF control is an extension to the Player object that allows new functionality to be added to a player without having to create a subclass. For instance, controls are typically used to provide things like freeze-frame functionality, or language choice, on top of the built-in functions of the Player class.
The final element is a data source. This is the object that actually gets the media data that the player will decode. By separating the object that decodes and presents the media from the object that fetches the media, we make it easier to decode and play the same type of media from more than source (and play several different media types from the same source). The DataSource class can be considered a little like the unified I/O model in a Unix platform, where everything appears like a file and can be manipulated with file operations. The application (and the player) can manipulate the DataSource object and get the media data through one single interface, without having to care if that data is coming from memory, a local hard disk, an HTTP that we don’t know about when we are implementing it.
A Player always has an associated DataSource object – it is not possible to create a player that does not have a data source attached to it.
The relationship between JMF components.
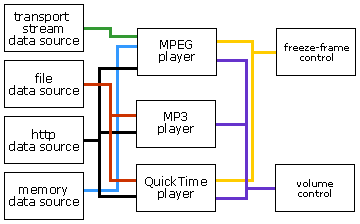
The diagram above (not based on a real system or standard) shows how these relationships work. On the left, we have four possible data sources that we can choose from. These can load data from an HTTP connection, a local file, from memory or from an MPEG stream respectively. The byte stream that we will get out of these data sources will be identical – an application could use any data source and get data in the same way using the same interface. Only the way that the data was loaded from would change.
The data source then sends its data to a player. In this example, we have three players that we can choose from. One handles MPEG-2 data, the second handles QuickTime movie clips and the final one handles MP3 audio data.
Finally, we have two controls available. The freeze-frame control is only applicable to those players that handle video, which in this case is the MPEG-2 and QuickTime players. The volume control, on the other hand, is applicable to all three players.
Now that we’ve seen the overall architecture, let’s take a look at how this actually fits with the API. The javax.media.Manager class is the main entry point for any application wishing to use the JMF API.
public class Manager {

  public static Player createPlayer(
    URL sourceURL)
    throws IOException,
    NoPlayerException;

  public static Player createPlayer(
    MediaLocator sourceLocator)
    throws IOException,
    NoPlayerException;

  public static Player createPlayer(
    DataSource source)
    throws IOException,
    NoPlayerException;

  public static DataSource createDataSource(
    URL sourceURL)
    throws IOException,
    NoDataSourceException;

  public static DataSource createDataSource(
    MediaLocator sourceLocator)
    throws IOException,
    NoDataSourceException;

  public static TimeBase getSystemTimeBase();

  public static Vector getDataSourceList(
    String protocolName);

  public static Vector getHandlerClassList(
    String contentName);
}
The most interesting methods are the createPlayer() and createDataSource() methods. The two versions of the createDataSource() method both create a new DataSource instance that will fetch data from the location referred to by the URL or the MediaLocator instance. Similarly, the createPlayer() method creates a new Player object that can be used to play a media clip. The only difference between this method and the createDataSource() method is that a player can be created from a DataSource as well as from a URL or a locator.
The player creation process
Given that a JMF implementation can have multiple data sources, and players to handle multiple media types, how do we get from a URL or a locator to a player that’s presenting a specific type of media from a specific source?
Let’s consider the process of creating a player from a URL. We’ll take a URL as our example, because in the end a locator also maps on to a URL. First, the application calls the static Manager.createPlayer() method. In this case, let’s assume it calls it with the following URL:
http://www.example.net/media/SomeContent.mp3
- The first thing that happens is the Manager examines the protocol part of the URL. The protocol indicates the data source that is needed to access this content, and the Manager uses this to construct the class name of the
DataSourceobject that it needs to create. This is calculated as<class prefix>.<protocol name>
.DataSourcewhere in this case, the protocol is
http. The class prefix is simply a fixed string that points to the top of the class hierarchy containing the data source implementation classes. So, if our class prefix wascom.stevem.media.protocol, the resulting class name would becom.stevem.media.protocol.http.DataSource - Once the class name has been created, the class is loaded and instantiated. The
DataSourceobject will be used to get the media data that will be presented. - Once the
DataSourceis loaded and instantiated, the Manager uses this data source to connect to the location specified in the URL (we will cover this process in more detail below). Once a connection has been established, the Manager uses thegetContentType()method on the data source to find the MIME content type of the data that the data source is connected to. - The MIME content type is then used to construct the class name for the Player that will be loaded. This is very similar to the process used to create the class name for the data source. The class name takes the form
<class prefix>.<MIME type>.<MIME subtype>
.PlayerSo, if the class prefix was
com.stevem.media.playersand the MIME content type wasaudio/mp3(since we’ve connected to a URL for an MP3 file), the resulting class name for the player iscom.stevem.media.players.audio.mp3.Player - Now that the Manager has constructed the class name for the
Playerobject, it loads the class and instantiates it. Once the player is instantiated, the manager calls thePlayer.setSource()method to associate the data source with the player. - The Manager now has a completely instantiated player and data source, and the player is returned to the application.
This appears quite complex, but it’s really not. The most complex part is finding the MIME content type for the content referred to by the URL, but in many cases in an MHP receiver a protocol will only provide access to one type of content and so this is hard-coded in the DataSource classes.
A closer look at data sources
As you’ll have noticed from the steps above, there are a few steps that we glossed over during the player creation process. Probably one of the most important of these is the actual mechanics of the data source. The other is the mechanics of the player, which we’ll see in the next section.
First, let’s take a closer look at the interface to the DataSource class:
public class DataSource {
  public DataSource();
  public DataSource(MediaLocator source);

  public void setLocator(
    MediaLocator source);

  public MediaLocator getLocator();

  public abstract String getContentType();

  public abstract void connect()
    throws IOException;
  public abstract void disconnect();

  public abstract void start()
    throws IOException;
  public abstract void stop()
    throws IOException;
}
This isn’t very complex, but it’s important to understand it. The first thing to notice is the two constructors – while a DataSource object can be constructed using a MediaLocator directly, this is not the usual way that it gets created. Instead, the Manager normally ends up calling Class.newInstance() to instantiate this object (because the middleware doesn’t actually know what class it needs to load until run-time).
For this reason, we have separate methods to set and get the locator as well as being able to set it using the constructor. Without an associated locator, the data source is useless. We can only set the locator once – attempting to set it a second time will generate an error.
The reason for this restriction is that if an application could set the locator, we would have to check that the locator was actually compatible with the data source (e.g. that only a HTTP URL was used when setting the locator for an HTTP data source). Since creating an new data source is not very resource intensive (although using the data source may be), it’s easier to simply force the application to create a new data source every time it needs one. We can always trust the Manager to set the locator correctly, because that’s a part of the middleware and so the receiver manufacturer can verify that this always does the right thing.
Once we’ve set the locator, we actually have a valid data source. The next thing that needs to be done is to connect the data source to the location specified by the locator. Until we’ve done this, we have no way of accessing the data or even knowing if the locator refers to a valid location. This method may do different things depending on the data source. For instance, in a data source that fetches data fro the local filesystem, the connect() method will open the file, while in an HTTP data source, the connect() method will set up an HTTP connection to the URL that’s specified in the locator.
Having made a connection, we can actually find the type of data that the locator refers to using the getContentType() method that we’ve already seen. In a PC-based JMF implementation, it’s almost impossible for the JMF implementation to know the content type of the data until a connection exists – for example, it may need to get the information from the HTTP headers or even from header information contained in the data itself.
In a JavaTV or MHP implementation, however, where there are a limited number of standard data sources and content types that are supported by the receiver, the content type can sometimes be known just from the type of data source used to access it. In MHP, for instance, a dvb:// locator that does not contain a path component (which would be ignored by JMF anyway) is always used to access a DVB service or elements of a DVB service, and so the data source for the dvb protocol knows that it will never be accessing any content type other than multipart/dvb.service (the MIME content type for a DVB service as specified by MHP). In a JavaTV environment, a different protocol may be used for accessing DTV services. Since the JavaTV specification says nothing about the format of the locators to be used, however, a project using JavaTV may need some further implementation guidelines to define the MIME content types (unless there’s a way of getting this information from the protocol
being used).
In the case of some data sources and content formats, the data may not be available until the player is created and has started playing the media, and so we have to rely on the URL to guess the content type correctly. The video ‘drip’ content format in MHP is a good example of this, and we will look at this format in more detail later in the section.
The start() and stop() methods respectively start and stop data transfer. it’s only when the start() method is called that the data source actually has data that it can pass to a player. Obviously, the data source must be connected to the actual source of the media data before start() can be called.
Once the data source is no longer in use, the disconnect() method can be called to disconnect the data source from the actual source. The advantage of doing this is that if some scarce resources are needed to the connection keep alive (e.g. a modem connection to a sever), then the resources can be explicitly released when they are not in use. By separating the connection/disconnection process from the process of actually getting data, the time-consuming parts such as connection setup can be carried out before the data is actually needed, thus saving time when the data is required.
JMF players
We’ve seen how to create a player, and so now it’s time to see how we can actually use it.
public interface Player extends MediaHandler,
                                Controller,
                                Duration {

  public abstract void setStopTime(Time stopTime);
  public abstract Time getStopTime();
  public abstract void setMediaTime(Time now);
  public abstract Time getMediaTime();
  public abstract long getMediaNanoseconds();
  public abstract Time getSyncTime();

  public abstract float getRate();
  public abstract float setRate(float factor);

  public abstract int getState();
  public abstract int getTargetState();

  public abstract void realize();
  public abstract void prefetch();
  public abstract void start();
  public abstract void syncStart(Time at);
  public abstract void stop();
  public abstract void deallocate();
  public abstract void close();

  public abstract Control[] getControls();
  public abstract Control getControl(String forName);
  public abstract GainControl getGainControl();

  public abstract void setSource(DataSource source)
    throws IOException,
           IncompatibleSourceException;

  public abstract void addControllerListener(
    ControllerListener listener);
  public abstract void removeControllerListener(
    ControllerListener listener);
}
As you can see, this is a pretty complex interface. What’s really scary is that this is not the whole interface. Before you start panicking too much, don’t worry – you don’t need to understand or even know about most of the stuff that a Player can do. If you’re really interested, I recommend the book ‘Programming with the Java Media Framework‘ (Sean Sullivan, Loren Winzeler, Jeannie Deagen and Deanna Brown, pub. Wiley).
There are some differences between players in DTV middleware implementations of JMF and players in the desktop PC version. Some of these will be described later, but we’ll cover a couple of them here as well. The first of these differences is that some of the standard features of players in a desktop implementation are not available. These include things like the setSource() method (inherited from the MediaHandler class), since setting the data source in this way has little or no meaning in an MHP environment due to limitations imposed by the hardware.
Another difference is that the selection of media may be driven more by user preferences or platform settings than would be the case in a desktop implementation. For instance, the choice of audio track or subtitles will probably be based on user preferences and the language settings in the receiver firmware, whereas a desktop implementation would typically only have to handle clips that included only one audio or subtitle language.
The largest difference, however, is that players in a desktop JMF implementation will usually have a user interface or control panel attached, while in a set-top box or other consumer implementation they probably won’t. The Player.getVisualComponent() and Player.getControlPanelComponent() methods will usually return a null reference in a JMF implementation for digital TV, because the media is typically played in the video layer. The graphics section discusses the various layers in an MHP display – while devices based around other standards may not work in exactly the same way, the principles will probably be similar.
It is possible for Player.getVisualComponent() to actually return a java.awt.Component instance under certain circumstances, however. Players that are presenting video streams typically display their content in the video layer, which is outside the AWT graphics hierarchy. Some high-end receivers may allow the ‘true’ integration of graphics and video however, depending on how MPEG decoding is implemented, and in these cases the Player.getVisualComponent() method may return a component that can be used by the application to handle scaling and positioning of the video.
These restrictions on how video is decoded are caused by limitations of the hardware in the receiver. Typically, a digital TV receiver will use hardware MPEG decoders and demultiplexers that are designed specifically for digital TV applications and which are highly integrated with other elements of the systems (e.g. the CPU and the graphics processor). The true integration of video and graphics can really only be done if the receiver uses an advanced MPEG decoder and graphics processor, and many processors are simply not fast enough to do this at a price that makes them suitable for use in most digital TV systems.
The player state machine
A player can be in one of several states, depending on what it’s doing at the time. There are four major states that a player can be in:
- Unrealized
- Realized
- Prefetched
- Started
There are a number of other minor states that we will see later.
When a player is first created, it is in the Unrealized state. Calling the realize() method moves the player into the Realized state, where the player has all the information it needs in order to get the resources needed for playing a media clip. This doesn’t mean that it actually has all the resources, but it’s probably got all the resources it needs except for scarce resources such as MPEG decoders.
The prefetch() method moves a player in to the Prefetched state – at this point, the player has got all the resources it needs (including scarce resources) to play the media. It has also fetched enough of the media data to be able to start playing immediately. Originally, this state was intended to allow the player to download enough data from a remote connection to start playing a clip as soon as the start() method is called. This allows an application to know that network latency issues (for instance) will not become an issue when it calls the Player.start() method.
Although in an MHP receiver it may look like this method doesn’t do very much (since media data is always delivered to the receiver by broadcast), this is actually not the case. Since some media data (e.g. audio clips) will be loaded from a DSM-CC filesystem, where latency can be very high, this is still a useful state which allows applications to handle some of these potential delays effectively.
The final state is the Started state, which is entered when the start() method is called. When a player is in the Started state, it is actually playing media and is doing everything that you’d expect.
Each of the methods we’ve seen here (realize(), prefetch() and start()) can be called from any preceding state – they will automatically call the other methods as necessary to get the player into the appropriate state. These methods may take some time to execute, though – for instance, we’ve no idea how long prefetching media data will take. For that reason, each of these state changes is asynchronous. Whenever one of these methods is called, the player goes into an intermediate state (Realizing, Prefetching and Starting respectively) and the method returns immediately. These are the minor states that were mentioned earlier, and the player will automatically transition out of these states when it can move to the correct state.
State transitions the other way, however, are all synchronous. The stop() method takes a started player to the Prefetched or Realized state, depending on the type of media that’s being presented. The deallocate() method is used to free any scarce resources that the player may have. Calling deallocate() when the player is in the Realized state (or higher), the player will return to the Realized state. If a player is not yet in the Realized state, it will return to the Unrealized state. The close() method will free any resources (scarce or not) that are used by the player and destroy it so that it can no longer be used.
The diagram below should make the state model a little clearer:
The state diagram of a JMF player.
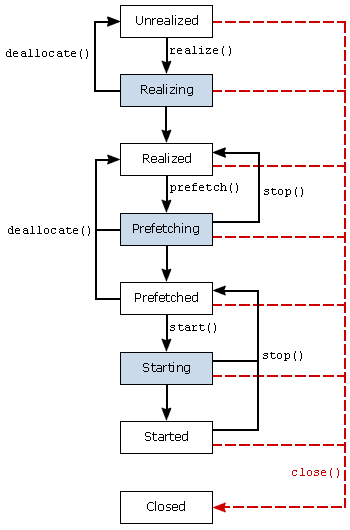
The states colored blue will automatically transition to the next state when all the necessary steps have been carried out.
Player events
As with other asynchronous APIs, JMF uses events to notify interested applications about changes in the state of a player. The Player.addControllerListener() method allows an application to register to receive events from the player.
Many of the events that get generated correspond to state transitions within the JMF player. The javax.media.TransitionEvent and its subclasses (PrefetchCompleteEvent, RealizeCompleteEvent, StartEvent, StopEvent, DeallocateEvent and ControllerClosedEvent correspond directly to state transitions within the player. The StopEvent class has a number of subclasses that indicate why the player. These are shown in the table below:
| Event | Description |
|---|---|
DataStarvedEvent |
Indicates that the player stopped because data was not delivered quickly enough from the data source. |
EndOfMediaEvent |
Indicates that the end of the media clip was reached. |
RestartingEvent |
Indicates that a player has stopped so that it can process a change of rate or change in media time and needs to prefetch more data before it starts playing again. |
StopAtTimeEvent |
Indicates that the player has reached the stop time that has been set for it and has stopped automatically. |
StopByRequestEvent |
Indicates that an application has called the player’s stop() method. |
MHP and GEM add the org.davic.media.MediaPresentedEvent to the list of transition events. This event is generated when the player actually starts presenting media to the user. This may be subtly different to the time that the player starts, and so the separate vent allows applications to synchronize exactly with the start of media presentation.
Other events are defined to notify the application about problems with the connection to the data source, or about changes to the player such as a change of rate or a change in the media time that the player should stop at. These are covered in more detail in the JMF specification.
The org.davic.media package also defines the ResourceWithdrawnEvent and ResourceReturnedEvent that allows an application to know about resource issues that concern the player. These events don’t affect the state of the player (unlike the events listed above), because even though a player has lost some resources, it may still be rendering some content. This is different from the javax.media.ResourceUnavailableEvent, which indicates that a player has lost a recourse that is vital to it and which it can not continue without. A ResourceUnavailableEvent may occur at any time during the lifecycle of the payer, and is not limited just to those times when the player is actually presenting content. The org.dvb.media package included in MHP defines the PresentationChangedEvent. This deals with the situation (almost unique to digital TV) where the content being presented may change due to events outside the control of the application.
This could be due to the end of a free preview period, for instance, where an unencrypted stream is no longer available.
All events relating to JMF players are subclasses of the ControllerEvent class.
Restrictions on JMF Players in MHP – tuning
One thing that is quite easy to miss in the MHP specification is section 11.2.8 – this is a short section that can have a major impact on your application, so it’s important to realise it’s there. This section specifies that unless it’s explicitly stated, no API will cause an MHP receiver to tune.
It’s not stated anywhere in the MHP specification that the JMF API will cause a receiver to tune, and so there is an important consequence hidden away there for anyone using JMF. A JMF player in an MHP implementation will not tune to a different transport stream. The application must explicitly tune to that TS first, using the tuning API or another mechanism. Any service on the current transport stream will be available, but services on other transport streams will not, unless you explicitly tune to that transport stream first.
This is a fairly major implication that’s hidden way here, and it took some discussion between various people involved in this part of the standard for us to realise that yes, this is actually what happens. Caveat developer – some important things are hidden away in corners of the spec that you may not think to look in.
JavaTV is silent about what happens when you try to play a media clip from a different transport stream, and so JavaTV implementation may or may not tune, depending on any implementation guidelines that are in force, or depending what is specified in any other associated standard such as OCAP.
Timebases, clocks and the media time
Most APIs for playing streamed media have a concept of media time, regardless of the content format or the platform. This media time is a time-based index into the clip, and usually it is taken as the start of the media clip. JMF is no exception to this, and one of the other major sets of methods in the Player interface are related to the manipulation of the media time and related concepts.
Unfortunately, this model doesn’t work very well in a broadcast environment. If the media is always being streamed, what do we mean by media time? Is it the time since the start of the event? The time since the user selected the current service? The time since the box was last switched on? Potentially, it can be anything the broadcaster or box manufacturer wants!
In the case of a broadcast stream, the media time is simply a time value that always increases in a way that’s platform-dependent, and which may or may not resemble any values from the real world. Basically, there’s nothing useful that a player for broadcast streams can do with the media time or any related concepts. However, the rest of the concepts here do apply to non-broadcast media clips (e.g. audio from file) so they are still worth knowing.
Normally, Java Media uses the concept of a clock and a timebase that work together to decide how the media time for a particular clip changes. A timebase is simply a constantly increasing time reference (a free running clock) that increases at a constant, unchanging rate. And when we say constant, we mean constant – the timebase continue to run even if the clock (and the player they are both associated with) has been stopped. An MHP receiver may have several different timebases existing at the same time, depending on what media types it’s handling.
A timebase is useless without a clock, which determines how the timebase causes the media time to change. The JMF Player class is a subclasses the Clock class, so every player acts as its own clock. Each clock has a rate – a floating-point value that defines the mapping between the timebase and the media time. If the rate is 1.0, then the media is being played at normal speed. A rate of 2.0 indicates double-speed playback, and a rate of 0.0 means that the clock (and the player) is stopped. The rate doesn’t have to be positive – a rate of -1.0 means that the stream is being played backwards at normal speed.
The relationship between media time, a clock and its timebase.

One major issue in a digital TV implementation is what we actually mean when we are talking about media time. Do we mean the time since the start of the current show? The time since we turned on the receiver? The time since we switched to the current channel? These are all valid ways of measuring the media time (and there are many others), but they all have problems and there’s no agreement over which to use. This is one of the main areas of difference between JMF in set-top boxes and JMF on a a desktop PC. Unlike conventional PC media types, you can’t stop a broadcast stream. Similarly, you’re very limited in how you can change the rate of the player for a broadcast stream. In some cases (like a hard-disk based VCR), you may be able to rewind the stream or play a previously-recorded stream at a slower (or faster) rate. But once you reach the part of the stream that’s currently being broadcast, you can’t advance any further.
JavaTV is silent about what media time actually means, which solves the problem but isn’t actually very helpful. The handling of media time in MHP is a little more well-defined. The MHP specification allows the use of DSM-CC Normal Play Time (NPT) to indicate the current media time. If this is present, then may be used to set the media time for the current service. If it’s not present, or if the MHP implementation chooses not to use it, then the media time is simply an arbitrary value that increases at a constant rate.
DSM-CC Normal Play Time is a complex topic (as is everything DSM-CC related), and so we won’t cover it any more in this section. The tutorial on synchronization in MHP covers DSM-CC NPT in a more detail, and describes some of its strengths and limitations.
There is much more to clocks and timebases than we’re discussing here, in particular the role of clocks and timebases when synchronizing several players so that they can be controlled as one. This is covered in much more detail in the JMF specification if you are interested, but it is a complex topic that will probably not feature much in applications for digital TV systems.
Controls
As described earlier in this section, JMF uses the concept of a control to add extra functionality on to a player. This can allow a single control class to support several different players, while at the same time meaning that the player itself only has to implement a very small public API to provide this added functionality.
The main advantage that controls offer is that they do not affect the state of a player – any operations on the control will not affect the underlying state of the player. This allows some important functionality, which we’ll see later.
The Player.getControls() method returns an array containing all the controls available for that player. JMF itself defines a couple of controls that may be available, depending on the platform and the type of player, but a lot more are added by MHP and related standards as we’ll see below.
Controls don’t really have a standard API to the player, and they are usually designed to take advantage of non-public interfaces in the underlying middleware implementation. For this reason, it’s difficult for an application to use any other way of manipulating a player other than via its controls. Applications shouldn’t try to do things except via the standard controls, mainly because the interface that they would be using is probably non-standard. This is especially true for consumer systems, where there is no de facto standard implementation.
JMF Extensions in JavaTV and MHP
The biggest changes from the standard desktop JMF implementation come when you start looking at the extensions to JMF. JavaTV defines a couple of extra JMF controls, while MHP applications can use a lot of extra JMF controls above those defined in JavaTV (some of the extra controls were defined in the MHP specification, and some of which are borrowed from the DAVIC 1.4 specification).
These controls are mostly designed to fix the problems caused by the differences between the PC and broadcast environments. The list below is not intended to be a complete list of the available controls, but it does cover the most useful ones from the JavaTV and MHP specifications:
This control allows applications to assume more detailed control over the presentation of the elementary streams that make up a DTV service. The MediaSelectControl allows streams to be added or removed from the set of streams being presented by a player, allows for one elementary stream to be replaced with another (for replacing the current video stream with one showing a different camera angle). This can, of course, be extended to replace every part of the stream.
Since controls don’t affect the state of the player they are associated with, using a control to change which elements of the media stream are being presented can have some major advantages to the developer. There is no need to stop the player (or worse, have to create a completely new player) to change the media being presented.
javax.tv.media.AWTVideoSizeControl
This control allows an application to control how video is scaled and positioned on the screen. It supports scaling, positioning and clipping of video that’s being presented in the background layer of the display. Any video that’s being presented in the graphics layer (i.e. within the AWT hierarchy should use the normal AWT methods for changing the size and position of a component.
All of the scaling and resizing operations are done in the screen coordinate space (i.e. (0,0) in the top left corner to (720, 576) in the bottom right). To use this, an application creates a javax.tv.media.AWTVideoSize object to handle the needed transformations. The AWTVideoSize class takes two rectangles as arguments to the constructor – the first of these is the source rectangle – a rectangle representing the area in the source video stream that should be displayed. The second is the destination rectangle, identifying where on the screen this content should be displayed, and at what size. The AWTVideoSize object will automatically calculate the transformations that are needed, so these do not need to be calculated by the application.
org.dvb.media.BackgroundVideoPresentationControl
Like the AWTVideoSizeControl, this control is allows the user to control the video location. The only difference is that this control operates in a different coordinate space.
The BackgroundVideoPresentationControl uses an org.dvb.media.VideoTransformation object to set the transformation. This is very similar to the AWTVideoSize object that we’ve already seen, but the parameters are slightly different and the transformations must be partially calculated by the application. Instead of taking a source and destination rectangle as arguments to the constructor, the VideoTransformation takes a pair of scaling factors, a clipping rectangle in the source video, and a position for the clipped and scaled video as arguments.
The clipping rectangle in the source video operates in the coordinate space of the video (as for the AWTVideoSize class, but the destination location is calculated in normalized coordinates. This allows a better fit with the HAVi API.
If a player is presenting video in the AWT component hierarchy (i.e. Player.getVisualComponent() returns a non-null value), then neither the BackgroundVideoPresentationControl or the AWTVideoSizeControl controls can be used to adjust the size of position of the video. Instead, the usual methods for manipulating the AWT component should be used.
org.dvb.media.VideoFormatControl
As we’ve seen before, one of the problems of a TV environment is the sheer number of different picture formats and aspect ratios that receivers can handle. We’ve got 4:3, 14:9 and 16:9. Then, we’ve got letterboxed, pan and scan, shoot and protect…..
The VideoFormatControl provides a way for the application to find out some information about the decoder format conversion (DFC) that’s being applied to the video. This is the process that actually takes the incoming signal and transforms it into whatever format the receiver should display. As well as providing a way for the application to get the format of the original vide (from the Active Format Descriptor in the MPEG stream), it allows the application to monitor for changes in the active format description, the aspect ratio of the output or the decoder format conversion that is applied.
The application can’t set the decoder format conversion using this control, but it can at least know what format conversions are being applied. This may not seem very useful, but it does allow the application to, for instance, choose between graphics formatted for 16:9 display and those formatted for 4:3 display in order to keep a constant (and suitable) look and feel.
org.davic.media.LanguageControl
Subclasses of this control allow the application to choose which language the receiver uses for audio tracks and subtitles. While this could be done without this control (by using the DVB service information API to find out which stream contains the appropriate audio, then using the javax.tv.media.MediaSelectControl to select that stream), this provides a much simpler solution.
Each of the two subclasses allows the application to query the available languages, and select a language for presentation to the user. The org.davic.media.SubtitlingLanguageControl also allows the application to choose whether subtitles are displayed or not (assuming that subtitles are available).
As we’ve already mentioned, these are only some of the controls that are available. The full list of mandatory controls for an MHP receiver is:
org.davic.media.LanguageControlorg.davic.media.AudioLanguageControlorg.davic.media.SubtitlingLanguageControlorg.davic.media.FreezeControlorg.davic.media.MediaTimePositionControlorg.dvb.media.VideoPresentationControlorg.dvb.media.BackgroundVideoPresentationControlorg.dvb.media.VideoFormatControlorg.dvb.media.SubtitlingEventControljavax.tv.media.AWTVideoSizeControljavax.tv.media.MediaSelectControl
Not all of these controls are mandatory for all formats, however – in particular, org.davic.media.MediaTimePositionControl is only required for non-broadcast media clips.
The JavaTV API does note define any mandatory controls, although it’s likely that some controls will be commonly implemented if they are required by other standards.
An MHP special case – the video ‘drip’ content format
In the previous section, we introduced the video ‘drip’ content format in MHP. This is a slightly special case when talking about using JMF to present it, because it is the only content format where the media data is not loaded automatically by the JMF implementation. Instead, what happens is that we use a special feature of the JMF architecture to manage what is presented and when.
As is described earlier in this section, a JMF player gets the media data from a DataSource object. This data is usually loaded automatically by the DataSource object, but it doesn’t have to be. When presenting video ‘drips’, the data source that is used is an instance of the org.dvb.media.DripFeedDataSource class. This class has a special method, feed() that takes an array of bytes as an argument.
What happens is that a Player is created and started in the usual way, but will not present any media because as yet it hasn’t been told where to get its media data from – as we saw in the previous section, the locator used to create a data source for video ‘drips’ describes the content format, but nothing else.
What happens is that an application can create and start a player, then use the DripFeedDataSource.feed() method to provide some media data to the player. The player will then decode and present it. Of course, you can also call the feed( method before starting the player. In this case, what happens is dependent on the state of the player. If the player is in the Prefetched state when the feed() method is called, the data will be stored and displayed when the player is started. If the player is in the Started state, then as we’ve seen the content will be decoded and displayed immediately. If the player is in any other state,or the data source isn’t attached to a player, then the content simply gets thrown away.
Why is this useful? Well, imagine that you have a large image that you want to display progressively (e.g. adding items to the image as the user performs some actions). You can either have one full-sized image for every stage of the display, which takes a lot of memory, or you can encode everything as a set of MPEG-2 frames and simply store the differences from the first frame.
In the following example, we only add one extra button to the image, so instead of sending the entire image again, we can simply send the area containing the extra button as a P frame:
 |
I frame – complete image |
 |
P frame – update to previous I frame |
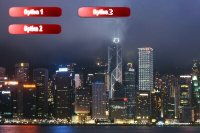 |
Final displayed image merges the P frame with the previous I frame |
In an MHP receiver that has a limited amount of memory, this is a useful and valuable option, since it can save an application a lot of time and memory that would otherwise be needed for loading and storing the images. It also allows the application to make use of the hardware MPEG decoder in the receiver to decode the images, rather than using CPU cycles to decode a JPEG image.
Getting a player for the current service
Sometimes, you don’t want to create a new player for your media – you may want to modify a player that already exists. The most common example of this is controlling the player for the parent service of your application. This is actually quite easy, but there are a couple of important things to remember. The first of these is that in order to do this, you need to use the JavaTV service selection API. The code below shows how to get a JMF player for the current service. Don’t worry if you don’t understand all of this – it will become clearer when you read the service selection tutorial.
// Get a reference to the JavaTV ServiceContextFactory
ServiceContextFactory factory;
factory = ServiceContextFactory.getInstance();

// From this, we can get a reference to the parent
// service context of our Xlet.  To do this, we need a
// reference to our Xlet context.  It's times like this
// that show why your application should always keep a
// reference to its Xlet context
ServiceContext myContext;
myContext = factory.getServiceContext(myXletContext);

// ServiceContentHandler objects are responsible for
// presenting the different parts of the service.  This
// includes the media components
ServiceContentHandler[] handlers;
handlers = myContext.getServiceContentHandlers();

for(int i=0; i < handlers.length ; i++) {
  if (handlers[i] instanceof ServiceMediaHandler) {
    // This is a Player for part of the service, since
    // ServiceMediaHandler objects are instances of JMF
    // Player objects
  }
}
One thing that is obvious from this code is that you may get several Player objects for a given service. Typically, though, only one of these will be presenting the main elements of the media (the audio and the video).
JavaTV uses the ServiceMediaHandler class to differentiate those players that handle parts of a service from other JMF players that may exist in the system. The distinguishing feature of a ServiceMediaHandler as opposed to other JMF players is that a ServiceMediaHandler will present all elements of the service that use the same clock – e.g. audio and video. Converting between the two is simple – a ServiceMediaHandler is actually a subclass of javax.media.Player and so a simple type cast can be used.